
Overview
AI Sizing adds a “Find my size” button to your product pages. Shoppers answer a few quick questions and get an instant size recommendation — the experience runs in the Kleep drawer, on top of your page. The Kleep app also:- Lets you customize the button’s UI directly in the Theme Editor
- Creates automated daily flows of Products, Orders and Returns data to keep recommendations up to date
Standard installation
The Kleep team installs AI Sizing for you (see the integration process). Under the hood it uses the Kleep app’s theme components — no theme code is modified:- The Kleep App Embed is enabled (Online Store → Themes → Customize → App embeds → Kleep) — it loads the sizing experience.
- The Button app block is placed on the product template (Add block → Apps) and styled from the theme editor.
CSS customization
You can customize the appearance of Kleep elements (buttons, popups, search) by adding custom CSS. Where to Add CSS In the Kleep App Embed settings, you’ll find an “Input custom CSS styles” field. Paste your custom CSS there.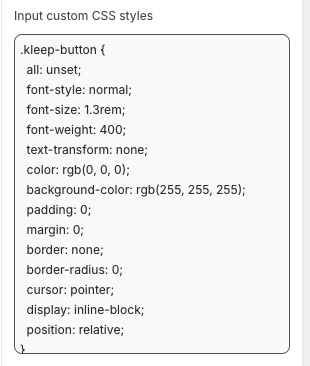
Code
Code
Manual installation
Use manual installation when your theme doesn’t support App Blocks — vintage themes (also called “legacy”, created before Online Store 2.0) — or when your team prefers to place Kleep’s code directly in the theme instead of using app blocks. Prerequisites- Access to the theme code editor (Online Store → Themes → Edit code)
- Kleep App Embed must be enabled in your Shopify admin (Online Store → Themes → Customize → App embeds → Kleep)
Product info block within snippets folder:
Code
Code
kleep-button.liquid within your snippets folder. Put the following content inside:
Code
Code
Code
Code
kleep-secondary-button.liquid within your snippets folder:
Code
Code
Product info block within snippets folder.
Code
Code
Translations (i18n)
These translations are required for manual installations (they also cover the Similar Products button labels). Add the following translations to your theme locale files. English (en.json)
Code
Code
fr.json)
Code
Code
it.json)
Code
Code
de.json)
Code
Code
es.json)
Code
Code
ja.json)
Code
Code
ko.json)
Code
Code
pt.json)
Code
Code
Technical reference
AI Sizing button location on PDP The location is defined by DOM selectors insideKleepSDK.getConstants():
targetProductInfoBlockQueries– Array of selectors pointing to the main container of product details (title, price, sizes, etc.). The script iterates through these selectors and uses the first one it finds as the insertion point for the AI Sizing button or popups.targetVariantQueries– Where size/variant options are. Once the product info block is found, the script searches inside it for variant elements (like size selectors). Each variant<label>(or equivalent) becomes a target for attaching the popup button.
checkIfMobile():
This function checks the browser’s navigator.userAgent string against a list of mobile devices (e.g., iPhone, Android, iPad).
- Desktop: The button is displayed as hover popups next to the variant labels
- Mobile: The script replaces hover popups with a single button, since hover interactions do not work on touch screens
- Shopify SKU field
- Metafield (specify which one)
- Tags (with prefix, e.g.,
ref:ABC123)
- Example: If variant SKUs are
ABC123-S,ABC123-M,ABC123-L, the master product reference isABC123 - Rule: Take first 6 characters / Split by and take first part / Custom regex
- Other variants of placement/layout are not provided beyond adjusting the selectors and CSS
- To change appearance (colors, spacing, fonts, etc.), paste your CSS into the “Input custom CSS styles” box in the Kleep App Embed settings
Troubleshooting
The button doesn’t appear- ☑️ Verify that the Kleep App Embed is enabled (toggle ON)
- ☑️ Make sure you saved the theme changes
- ☑️ Clear your browser cache and reload the page
- ☑️ Check that the product has size variants configured
- ☑️ Check that your product data contains the expected fields (tags, metafields, etc.)
- ☑️ Verify mappings in Kleep Dashboard → Settings → Data Mapping
- ☑️ Re-run the product scan to refresh detected values